Map Maker V3 Tutorial
Return to MainSome notes about changes in V3 of the Map Maker.
- Templates now use Excel 2007-2010 file format (no more down-saving required).
- Maps can be entirely customized through the web-interface and the "Options" tab in the templates.
- Map backgrounds can be enabled / disabled.
- Map labels can be enabled / disabled.
- Map legend can be enabled / disables.
- Attributes can be added / removed, moved, resized, recoloured, and use new fonts.
Templates
The first change involves the Template files used to create maps. The Emoti and Persona templates can be downloaded in a compressed format here.
When you open the files, you will notice 4 tabs across the bottom.

These tabs each survey a specific purpose.
- Maps
- This is where association data gets pasted in (typically the results from tabs).
- Errors
- This sheet checks to see if every item from the "Options" sheet has a matching data point in the "Maps" sheet.
- Options
- This sheet controls the following aspected of each map attribute.
- label
- The label that is displayed on the map. Each label is a map attribute.
- x_coord and y_coord
- The X and Y coordinate information for the attributes.
- font_size
- The font size (in pixels) of the attribute. Each attribute can have a different font size if required.
- hex_color
- A hexadecimal colour code. This will alter the colour of the attribute label. To create Hex colour codes easily, try visiting http://www.colorpicker.com/, pick a colour, and the Hex code appears in the box at the top of the screen.
- font_name (not included by default)
- Attribute font style can be controlled via this column. Available fonts are "ARIAL.TTF", "CALIBRI.TTF" and "TIMES.TTF".
- x_bleed and y_bleed
- Control the proportion of bleed vs. association score. For example, an association score of 50, with the default bleed of 1.5, would draw a heat point 75px wide. If the bleed was increased to 2, it would be 100px wide.
- label
- This sheet controls the following aspected of each map attribute.
- Help
- Some additional details on the workings of the template.
On the "Maps" sheet, the column titles in row 1 represent the map titles. These titles will appear in the upper left corner of each map, and the file names will closely match these titles.
Web Interface
On the main page of the web interface, there are three sliders which toggle various map features.

- Atrribute Labels
- Toggle this on and off to have the Map Maker include attribute labels on the maps. If off, maps will be made without attribute labels.
- Background Image
- Toggle this to include / exclude map background graphics. When set to off, the map background selection area will disappear.
- Legend
- Toggle this to include the display of the heat legend on the map.
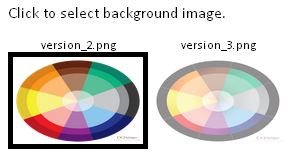
When the "Background Image" slider is set to the "On" position, this section will display the available background images. The options are Version_2, or Version_3, where the latter has the black outter rim for the negative zone.
Uploading Data
Once you've created the template file and selected the appropriate options, click the "Upload a file" button, or drag the XLSX file onto the button in your browser. The Map Maker will process the file, generate each map, and provide a link to compare the files.

Additional Notes
The main benefit of this new format for the templates is that completely custom maps can be created.
For example, if custom cogni maps need to be created based on something like a Stratospher Pilot study, the Coordinate data can be saved on the "Options" sheet (you can save over either the Emoti or Persona template file), the association data for the same labels can go on the "Maps" sheet, and then entirely custom maps can be generated.
Some additional uses could be maps where Drivers are displayed in a larger font, or different colour. Maps can be create without any heat (as are done with QCards) by simply including 0 (zeroes) as the association scores in the "Maps" sheet.